Passive App Plugin Development Case Study
This guide will take you through the development of a new passive app plugin with examples of how we developed the Faros plugin.
Initialise plugin repository
To get started, clone the Template plugin repository.
The following steps describe how to set up your own device repository by refactoring the template. For renaming the package and classes (steps 3 and 4), use the refactor functionality of Android Studio (shift-F6). This also renames all references to the packages and classes.
- Change directory name (
radar-android-template=>radar-android-faros) - Open the project in Android Studio.
- Rename the package (
org.radarbase.passive.template=>org..radarbase.passive.bittium) - Rename the following classes. e.g.:
TemplateDeviceManager=>FarosDeviceManagerTemplateDeviceServiceProvider=>FarosProviderTemplateDeviceService=>FarosServiceTemplateDeviceStatus=>FarosDeviceStatus
Edit
build.gradleand input the configuration parameters...... //---------------------------------------------------------------------------// // Configuration // //---------------------------------------------------------------------------// group = 'org.radarbase' ext.moduleName = 'radar-android-faros' ext.description = 'Faros plugin for RADAR passive remote monitoring app' ext.githubRepoName = 'RADAR-BASE/radar-android-faros' .....
Edit
strings.xmlto give your device a label and description (used in theDeviceServiceProvider)<resources> <string name="farosLabel">Faros</string> <string name="farosDescription">Collects data from Faros 90/180/360. The connection is made over Bluetooth using the location permission. Location information is not stored. </string> </resources>Edit AndroidManifest.xml to put in the references of
packageandservice.<?xml version="1.0" encoding="utf-8"?> <manifest xmlns:android="http://schemas.android.com/apk/res/android" package="org.radarbase.passive.bittium" > <application android:allowBackup="true"> <service android:name=".FarosService"/> </application> </manifest>packagerefers to the name given to the package (step 3)service android:namerefers to the DeviceService class (step 4)
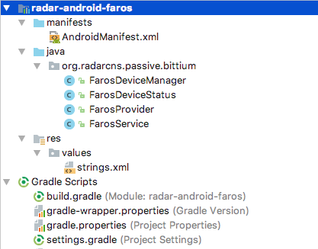
When you have completed the refactoring, your project should look like this in Android Studio. Check if everything is renamed properly by building the app with Gradle (./gradlew build).
Develop the schemas
Add the schemas of the data you intend to send to the RADAR-base Schemas repository. For the pRMT app, .avsc schemas for each plugin are stored in a different folder in the RADAR-Schemas/commons/passive directory. Be sure to set the namespace property to org.radarcns.passive.plugin so that generated classes will be put in the right package. All values should have time and timeReceived fields, with type double. These represent the time in seconds since the Unix Epoch (1 January 1970, 00:00:00 UTC). Subsecond precision is possible by using floating point decimals. For instance, the schema for the batterylevel will look as follows:
{
  "namespace": "org.radarcns.passive.bittium",
  "type": "record",
  "name": "BittiumFarosBatteryLevel",
  "doc": "Battery level of a Bittium Faros device.",
  "fields": [
    { "name": "time", "type": "double", "doc": "Device timestamp in UTC (s)." },
    { "name": "timeReceived", "type": "double", "doc": "Device receiver timestamp in UTC (s)." },
    { "name": "batteryLevel", "type": "float", "doc": "Battery level from 0 to 1. Note that the battery level is a rough estimate." },
    { "name": "exact", "type": "boolean", "doc": "Whether the batteryLevel can be taken as an exact value. True if the battery level is an exact representation, false if it is just an estimate based on the battery status (CRITICAL/LOW/MEDIUM/HIGH)." }
  ]
}
Create also an .yml file in RADAR-Schemas/specifications/passive/plugin-1.0.0.yml:
#====================================== Faros 90/180/360 device =====================================#
vendor: Bittium
model: Faros
version: 1.0.0
app_provider: .bittium.FarosServiceProvider
data:
  - type: BATTERY
    sample_rate:
      dynamic: true
    unit: PERCENTAGE
    processing_state: RAW
    topic: android_bittium_faros_battery_level
    value_schema: .passive.bittium.BittiumFarosBatteryLevel
If you need a unit that has not yet been implemented in RADAR-schemas, you can add it to the RADAR-Schemas/commons/catalogue/unit.avsc file.
After creating all the .avsc files and the .yml file, make sure you can build the project using java version 17 (export JAVA_HOME=’/usr/libexec/java_home -v 17.0.10’).
- Publish schemas:
Publishing schemas to Maven Local:When you are still developing your plugin, schemas are not published centrally. To access the java generated file from avro schemas first publish them to Maven Local.
To publish schemas locally to Maven, please follow these steps:
- Change your working directory to java-sdk in RADAR-Schemas.
Run the following commands in your terminal:
./gradlew build
./gradlew publishToMavenLocal
In your build.gradle file, add the following to your repositories block:
repositories {
    mavenLocal()
}
In the same build.gradle file, add the following to your dependencies block, replacing $radarSchemasVersion with its corresponding value:
You can find the version value in the metadata of your local Maven repository. It should end in SNAPSHOT.dependencies { implementation "org.radarbase:radar-schemas-commons:$radarSchemasVersion" }
Publishing schemas to Docker:
If your plugin is ready for production, you can publish your schemas using Docker. To do so, create a Docker account and download the Docker application. Make sure docker daemon is running. In the /RADAR-Schemas directory, run the following commands:
docker buildx build . --tag username/radar-schemas:0.1.0

docker push username/radar-schemas:0.1.0
After your schemas have been pushed to Docker, they can be deployed on the RADAR-base instance (see Deploy Schemas on RADAR-base)
4. Deploy schemas on the RADAR-base instance:
After your schemas have been pushed to Docker, they can be deployed on the RADAR-base instance, by following these steps:
Add the created schemas image to the catolog_server deployment by running:
kubectl edit deployment/catalog_server
- Add the username/radar-schemas:0.1.0 to the file after schemas → image. Make sure you add this line in two different places, and save the changes you made to the deployment file.
After the catalog_server deployment has been edited, make sure you start the following pods again in this order. Wait until each pod has restarted, before restarting the next one (you can see the current pod status using: kubectl get deployments).
kubectl rollout restart deployment catalog-server
kubectl rollout restart deployment management-portal
kubectl rollout restart deployment radar-s3-connector
To check whether the schemas have been correctly deployed, you can run the following command (make sure to use the correct catalog-server pod name, using kubectl get pods):
kubectl logs catalog-server-7b9845b459-kc2pw --container kafka-init
Develop the plugin
The plugin contains at least four classes, that each extend base classes from the RADAR-Android-Commons repository.
We explain the purpose of each class below.
DeviceManager
The heart and lungs of the plugin. The connection and data handling logic should be placed here.
The DeviceManager is implemented from org.radarbase.android.source.SourceManager and will connect to a device and collect its data, register all Kafka topics in its constructor.
Make sure your schemas are imported using:
import org.radarcns.passive.bittium*
Create a private val for each topic, using the following format:
private val batteryTopic: DataCache<ObservationKey, BittiumFarosBatteryLevel> = createCache("android_bittium_faros_battery_level", BittiumFarosBatteryLevel())- Make sure the connection to the device is established in the override fun start(acceptableIds: Set<String>) function.
Collected data can be sent using the ‘send’ function, using the following code:
send(batteryTopic, BittiumFarosBatteryLevel(timestamp, currentTime, level, false))
DeviceService
Creates the DeviceManager.
The subclass org.radarbase.android.source.SourceService is used to run the device manager. This SourceService manages the SourceManager and a TableDataHandler to store the data of a wearable device, phone or API and send it to a Kafka REST proxy. Specific wearables should extend this class.
DeviceServiceProvider
The provider talks to the main pRMT app and contains the device configuration parameters.
The subclass org.radarbase.android.source.SourceProvider exposes the new service. After the plugin has been created, ‘plugin.SourceProvider’ should be added to the global ‘plugins’ configuration of the pRMT application client in AppConfig.
DeviceStatus
Reports the device values to the pRMT app. For example the battery level should be configured here.
The subclass org.radarbase.android.source.SourceState is used to keep the current state of the device, you could also use org.radarbase.android.source.BaseSourceState.
Add the plugin to the pRMT app
To add the created plugin to the pRMT App, follow the following steps:
In the radar-prmt-android/app/build.gradle include the following line:
dependencies {

	implementation "org.radarbase:radar-android-faros:$radar_commons_android_version"

}
In radar-prmt-android/app/src/playStore/java/org/radarcns/detail/RadarServiceImpl.kt import the SourceProvider of the plugin, like:
import org.radarbase.passive.bittium.FarosProvider
And also make sure that the PluginProvider is added to the plugins variable, like:
override val plugins: List<SourceProvider<*>> = listOf(
	FarosProvider(this)
)
Existing Plugins
As an example, you could look at the plugins that have already been developed.
- Empatica E4: https://github.com/RADAR-base/radar-android-empatica
- Faros: https://github.com/RADAR-base/radar-android-faros
- Pebble 2: https://github.com/RADAR-base/radar-android-pebble
- Biovotion: https://github.com/RADAR-base/radar-android-biovotion